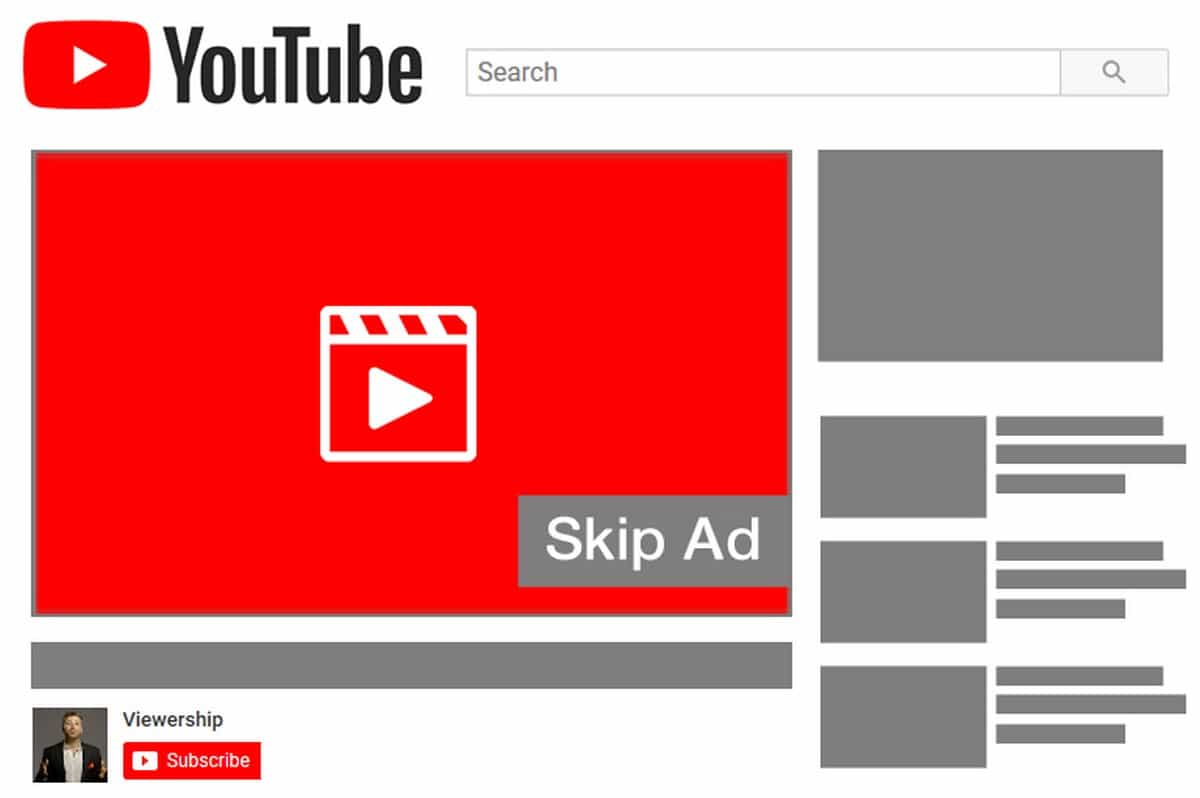
#1: Link Your YouTube Channel With Google Ads
Before you start your YouTube video ad campaign, you must link your YouTube channel to Google Ads so the data can flow into Google Ads.
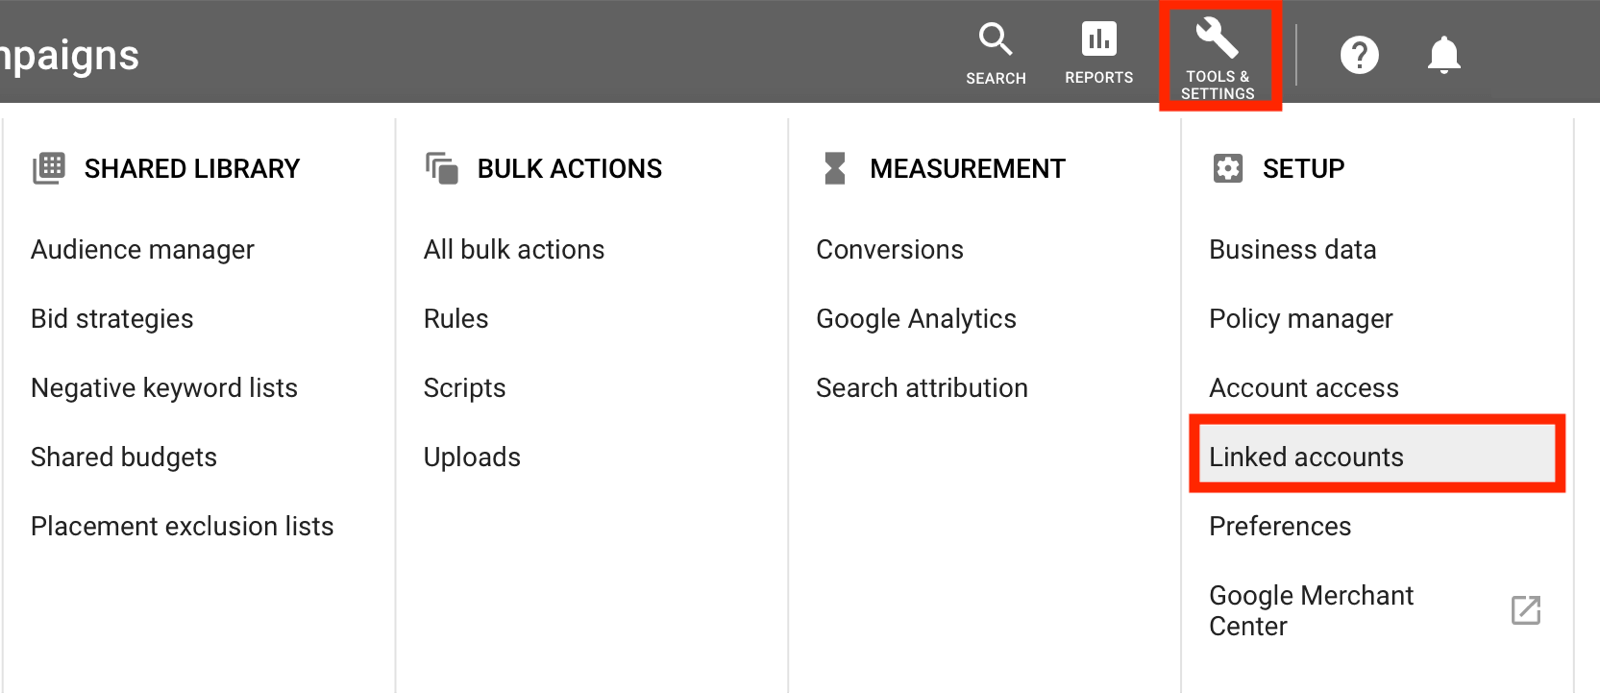
To do this, open your Google Ads dashboard and click the Tools & Settings button at the top right of the screen. In the pop-up menu, click Linked Accounts under Setup.
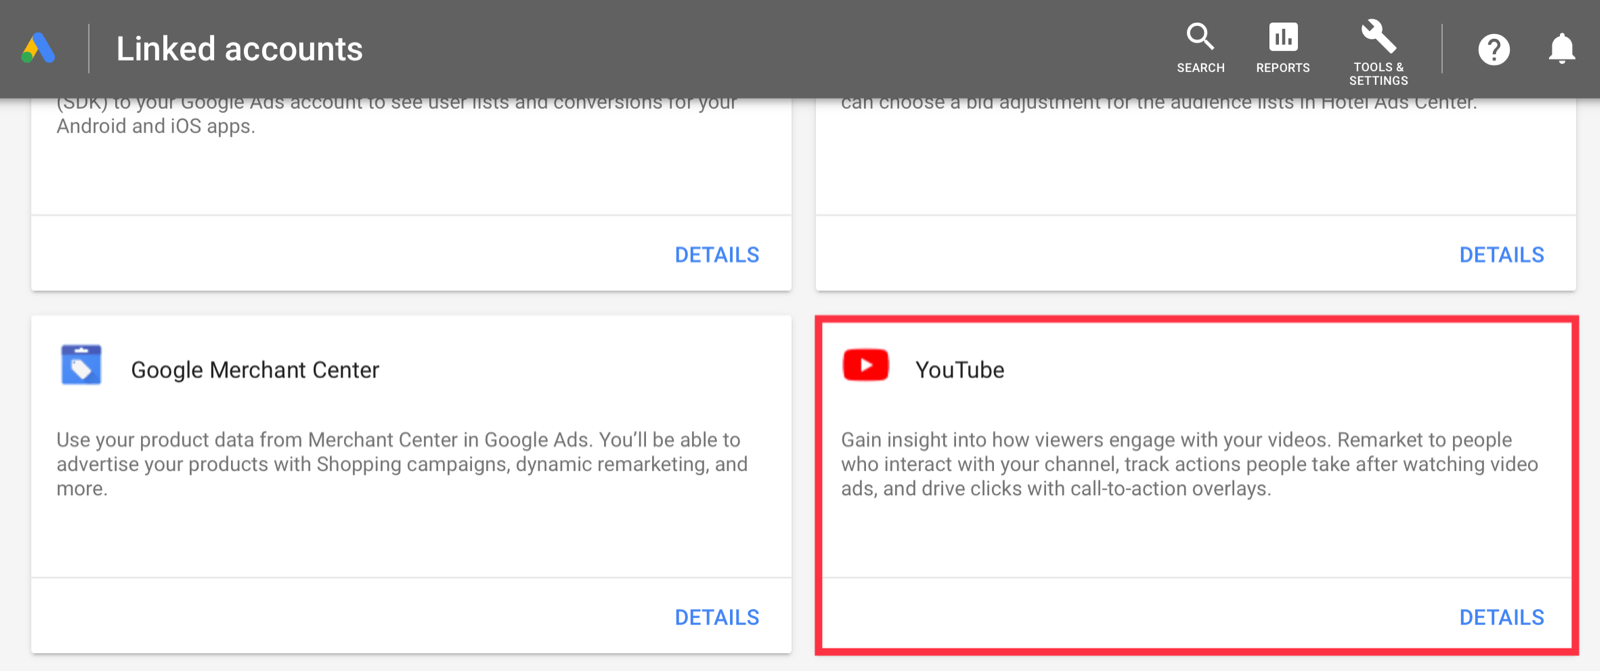
On the Linked Accounts page, scroll down and select YouTube.
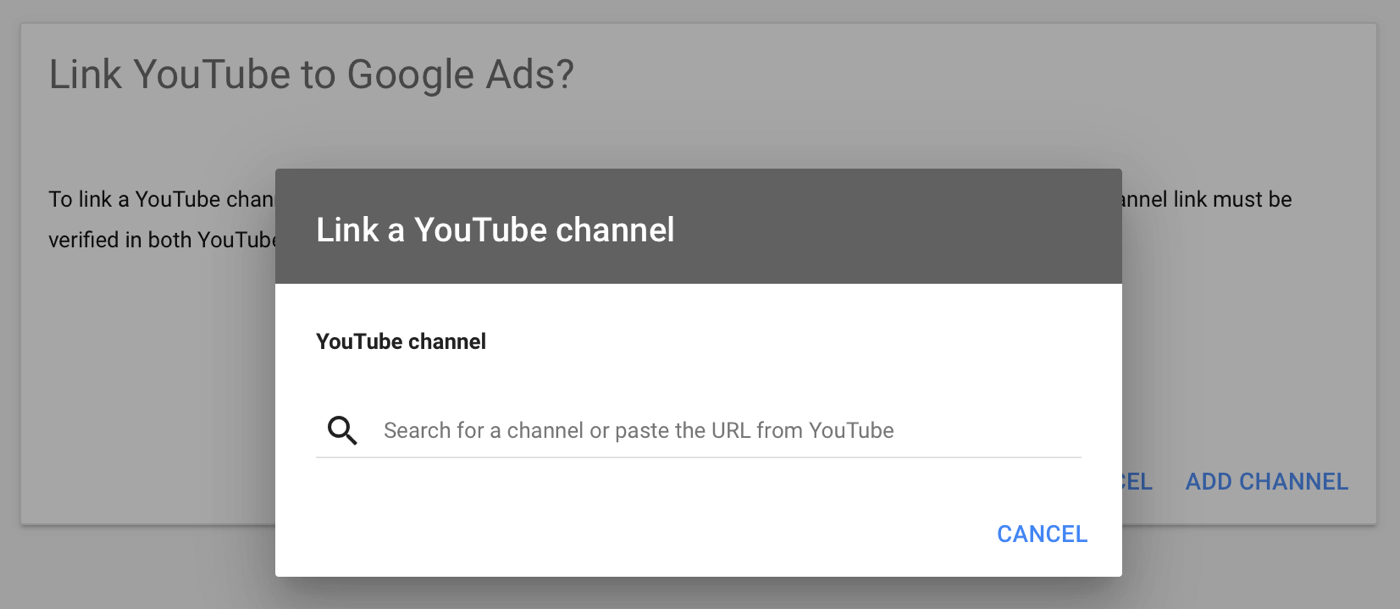
Then click the + button and follow the prompts to link your YouTube channel.
#2: Create a New Video Ad Campaign in Google Ads
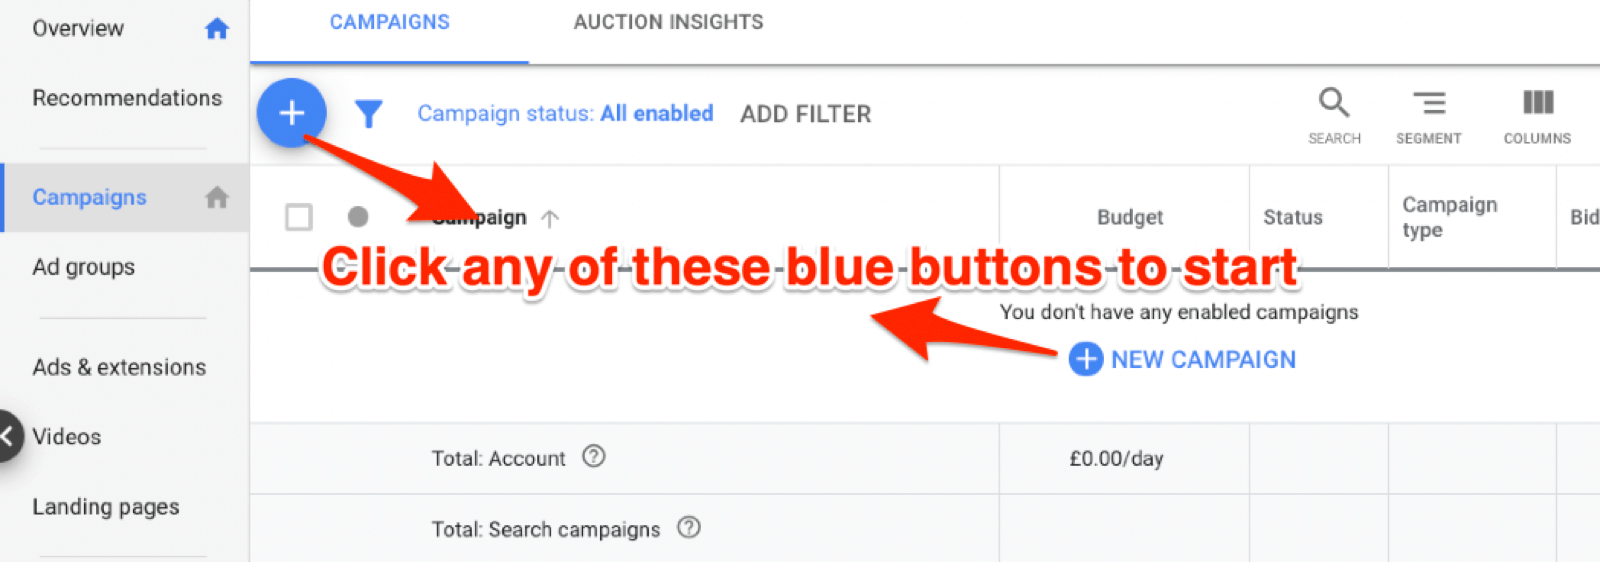
Now you’re ready to create your YouTube campaign. Start by opening the Campaigns tab on the left. Then click one of the blue + buttons and choose New Campaign from the pop-up menu.
On the next page, select a campaign goal, which can be somewhat confusing when setting up a campaign. Many advertisers confuse goals with conversions and think that if they don’t set up a goal, the conversions won’t be tracked. Conversion tracking is separate from these campaign goal types.
If this is your first time running a YouTube campaign, I recommend choosing Create a Campaign Without a Goal’s Guidance. This option gives you full bidding options so you can start with setting a manual cost per view (CPV). Once you have enough data and conversions, look at the other goals.
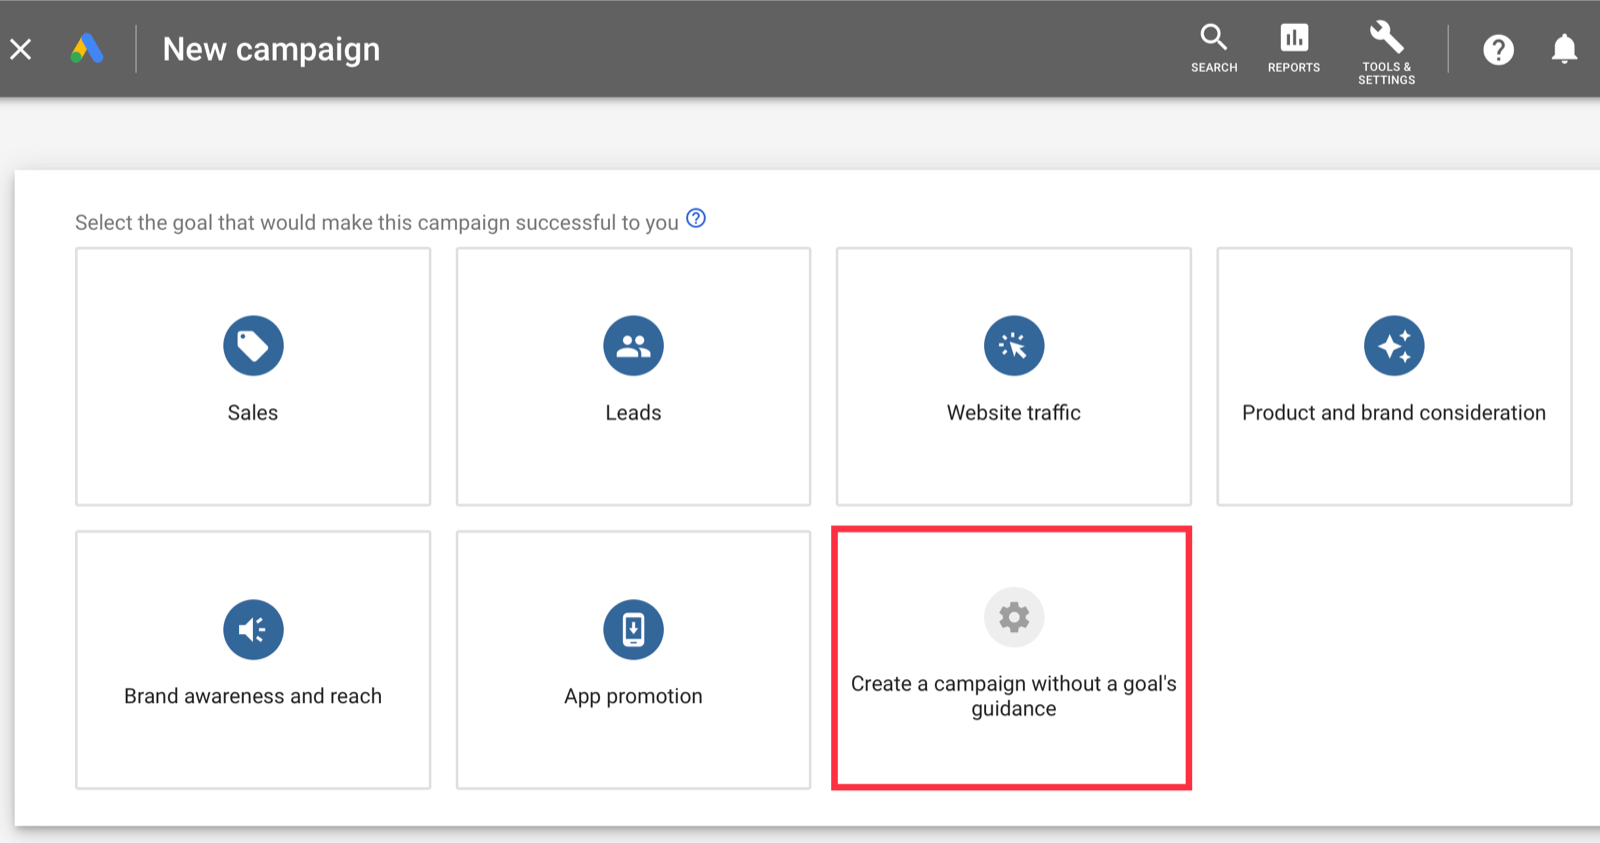
When you start with any other goal type, often you won’t get impressions because Google doesn’t have any data to work with. If this happens with your account, create a new campaign and set up the campaign without a goal.
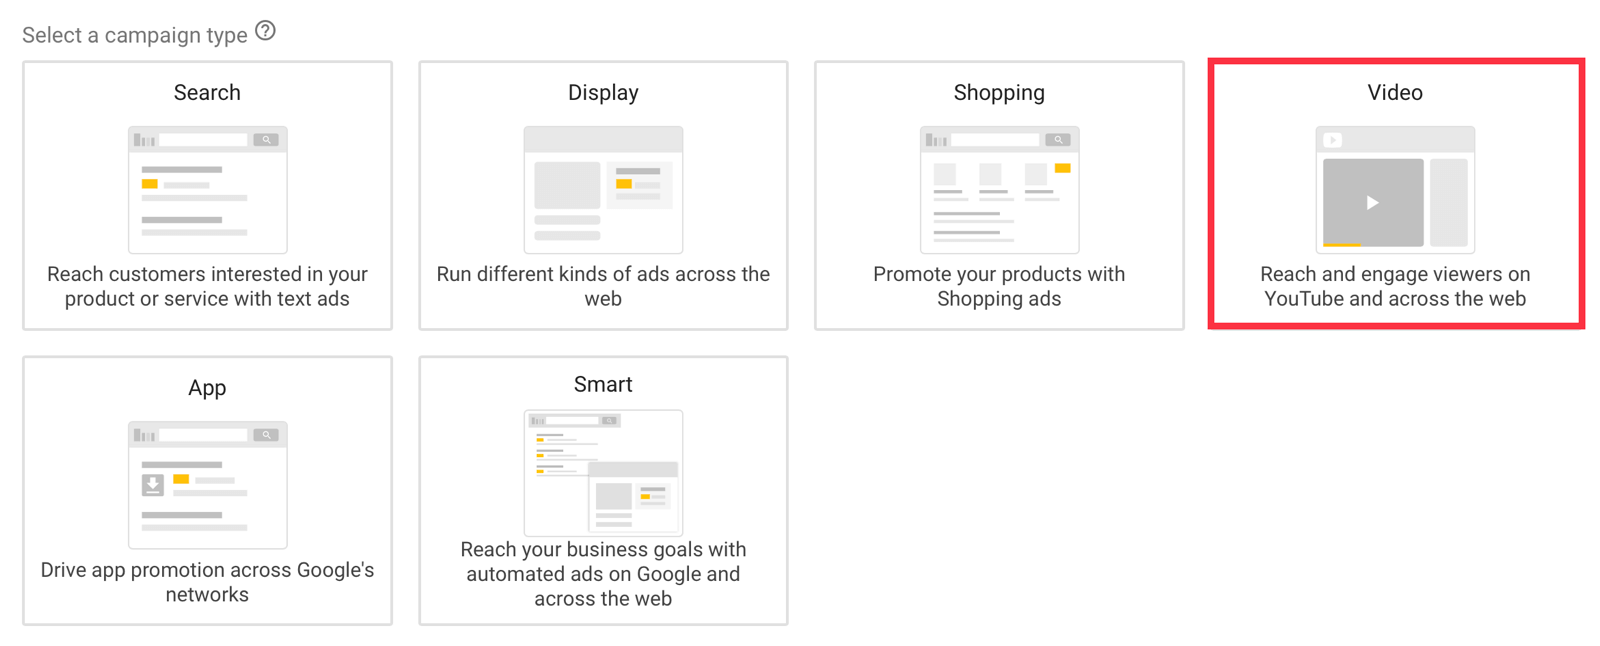
Next, choose Video for the campaign type.
You can run both video and image ads on YouTube. Here’s a rundown of the video ad types:
- Skippable video ads are shown before, during, or after the main video. Users can skip these ads after 5 seconds.
- Non-skippable video ads appear before, during, or after the main video. These ads can be 15 or 20 seconds long, depending on regional settings.
- Bumper ads are also non-skippable. They play in the main video and can be up to 6 seconds long.
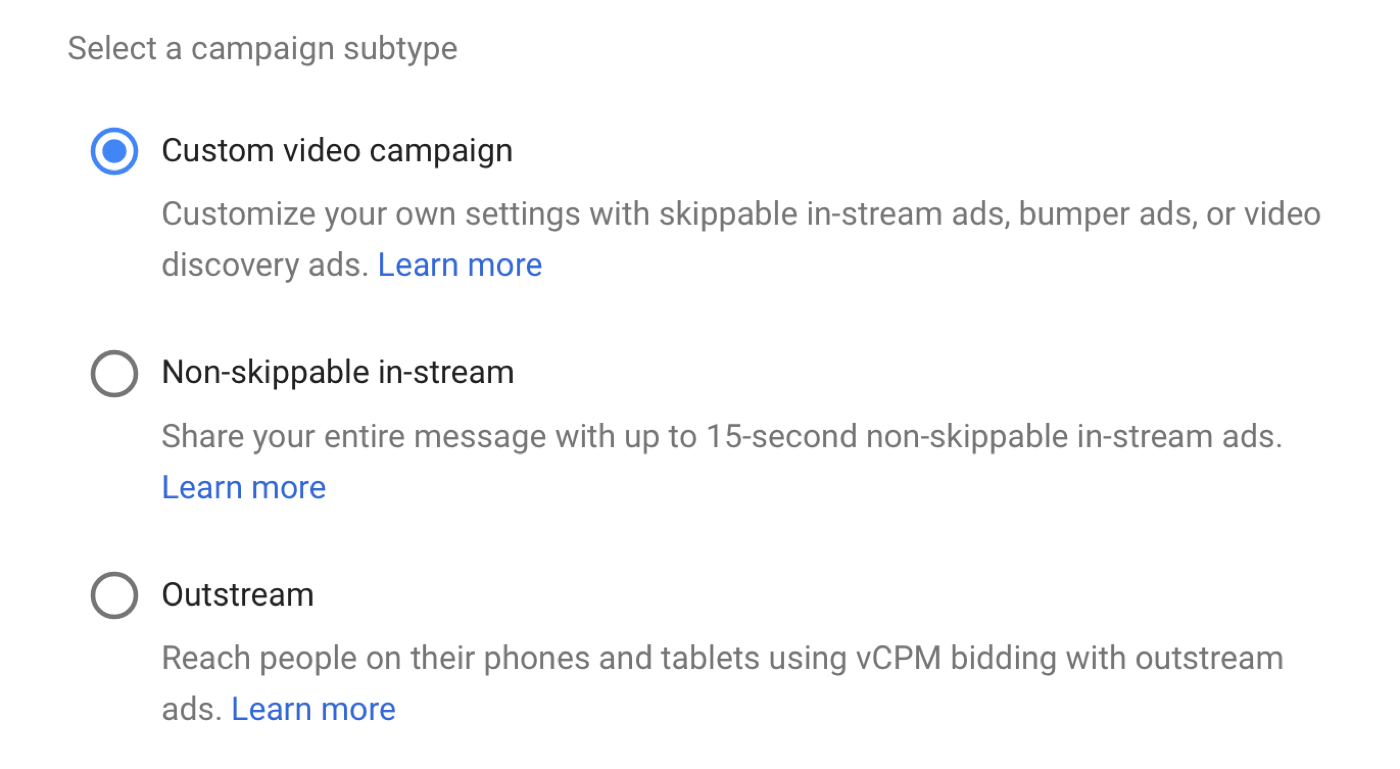
For this example, choose Custom Video Campaign for the campaign subtype and then click Continue.
Select a Bidding Strategy and Budget
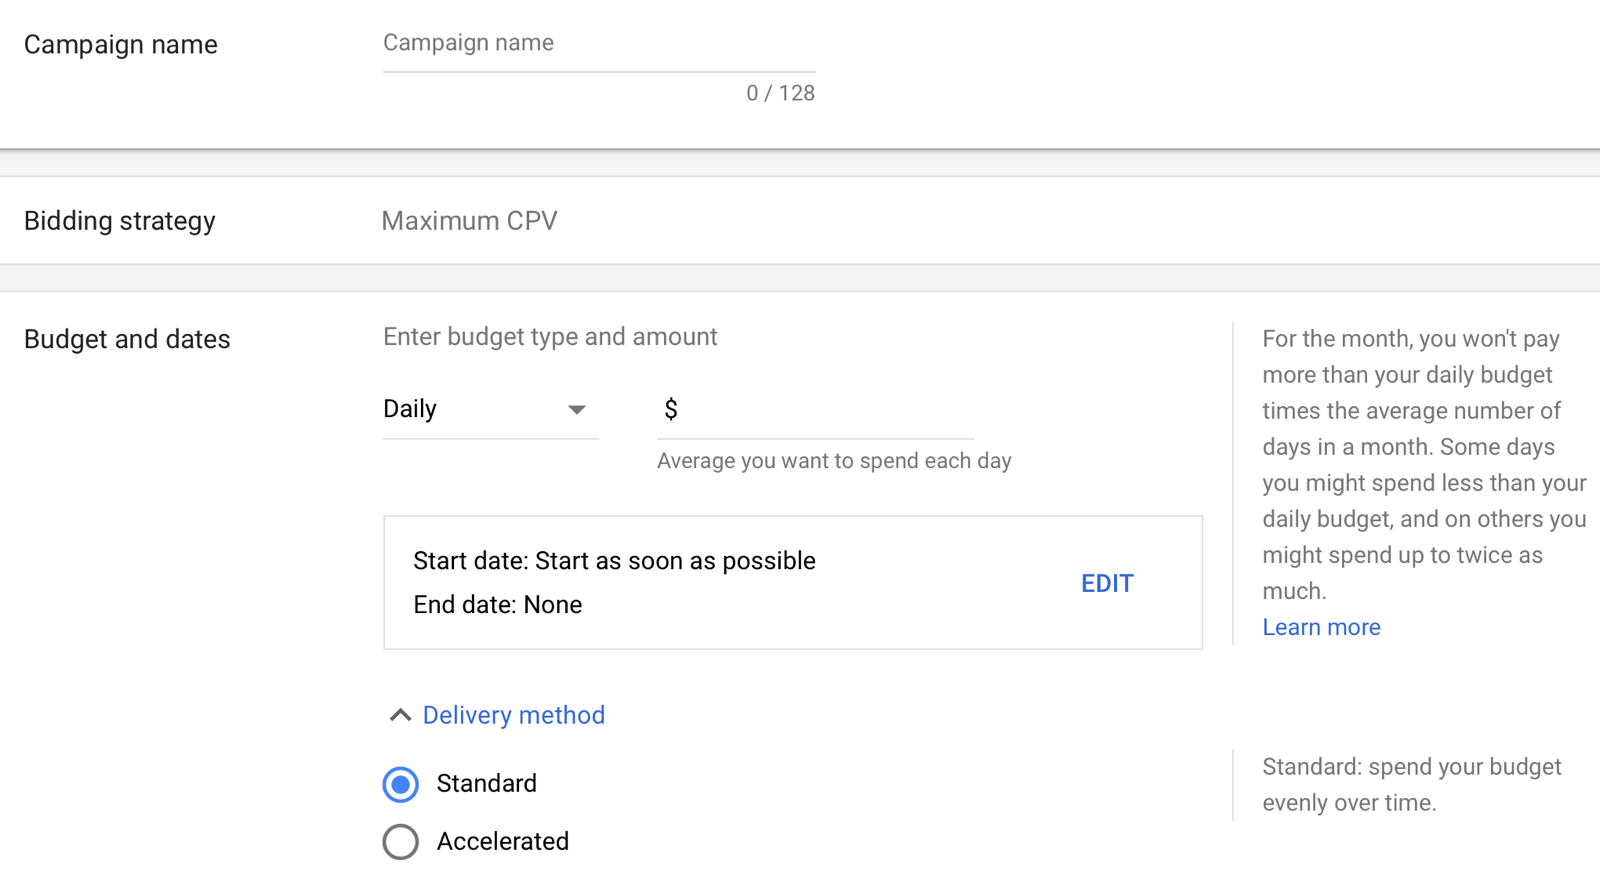
On the next page, enter a name for your campaign.
For the bidding strategy, select Maximum CPV. Usually, the CPV is between $0.05 and $0.12. If you set up a bid and you don’t get any impressions, then raise your bid.
For the budget, you can choose a daily budget (my recommendation) or a campaign total budget.
Next, you can set a start and end date if you want. I tend not to set an end date because I keep a close eye on my campaigns and will stop them manually if needed.
Set the delivery method to Standard. If you go with Accelerated, Google will spend your daily budget as soon as it can and your budget may not last the whole day.
Choose Networks
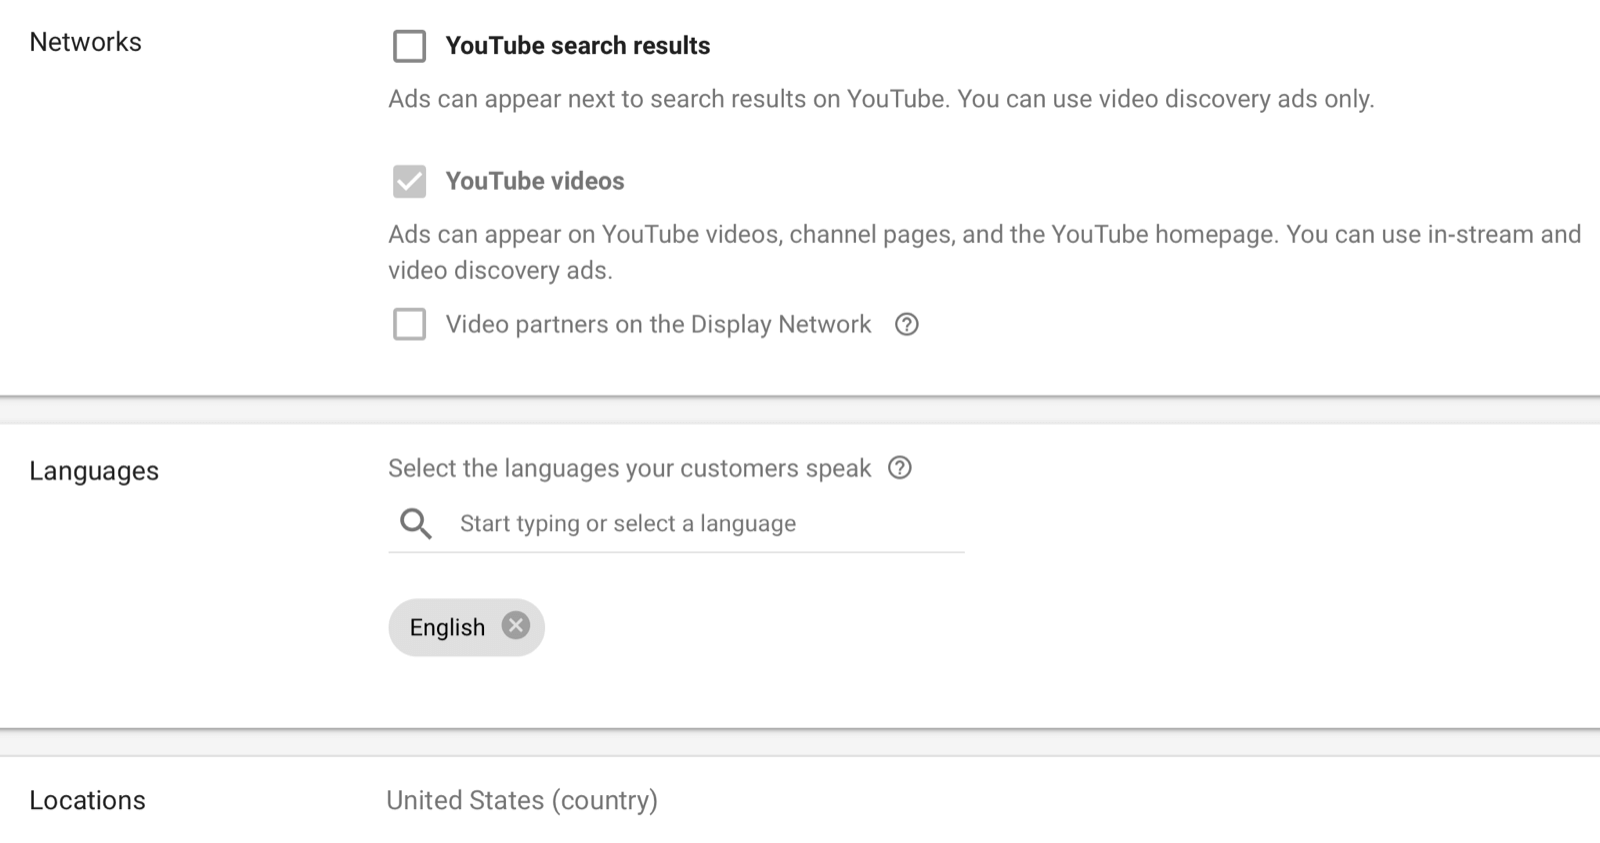
Under Networks, select YouTube Videos and uncheck YouTube Search Results and Video Partners on the Display Network. If you want to run your ads on these placements, set up a different campaign so your data will be more granular.
Next, choose your language and set your location to either countrywide or local areas (if you only want to run your ads locally). If you click Advanced Search, you can also set the location by radius.
Set Content Exclusions
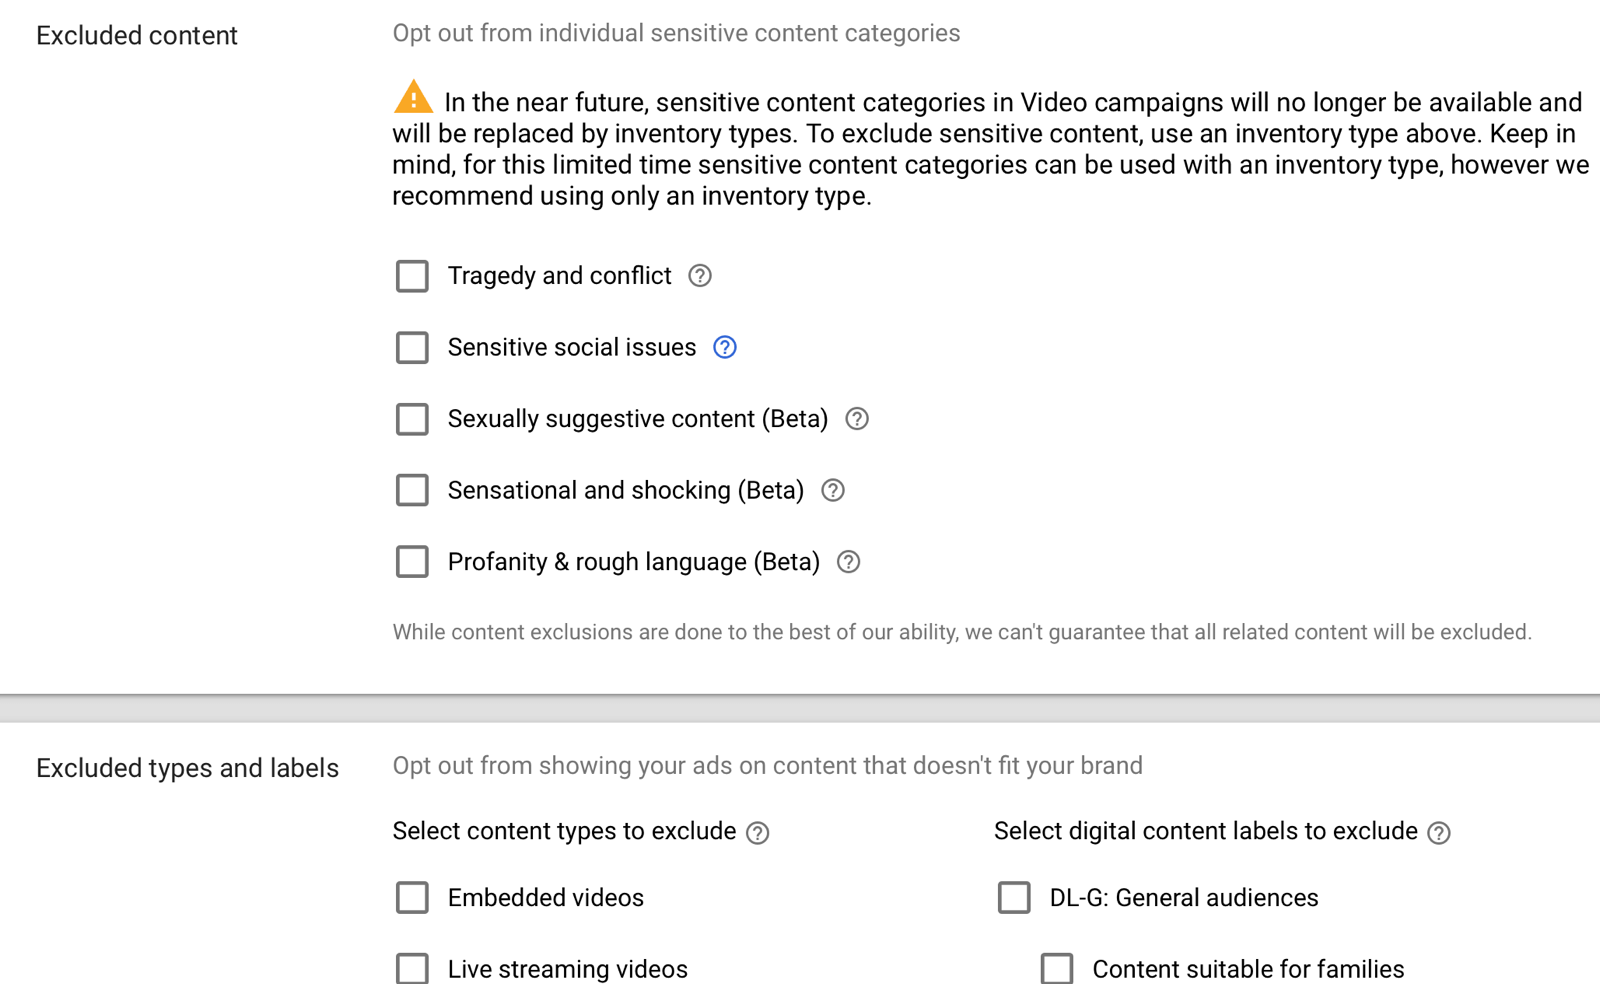
Content exclusions let you define and choose where you want your ads to be shown.
Under Inventory Type, select the inventory that’s right for your brand. Your options are Expanded, Standard (recommended), and Limited.
The Excluded Content options let you opt out of sensitive categories and categories unrelated to your business.
The Excluded Types and Labels options allow you to opt out of showing your ads on content that doesn’t fit your brand values.
Click Additional Settings to see more exclusion options.
Under Devices, you can choose which devices you want your ads to be shown on (computers, mobile, tablets, and TV screens). You might want to create separate campaigns for each device so you can see the data granularly.
Use frequency capping to help you avoid annoying your audience by showing your ads every time they go to YouTube.
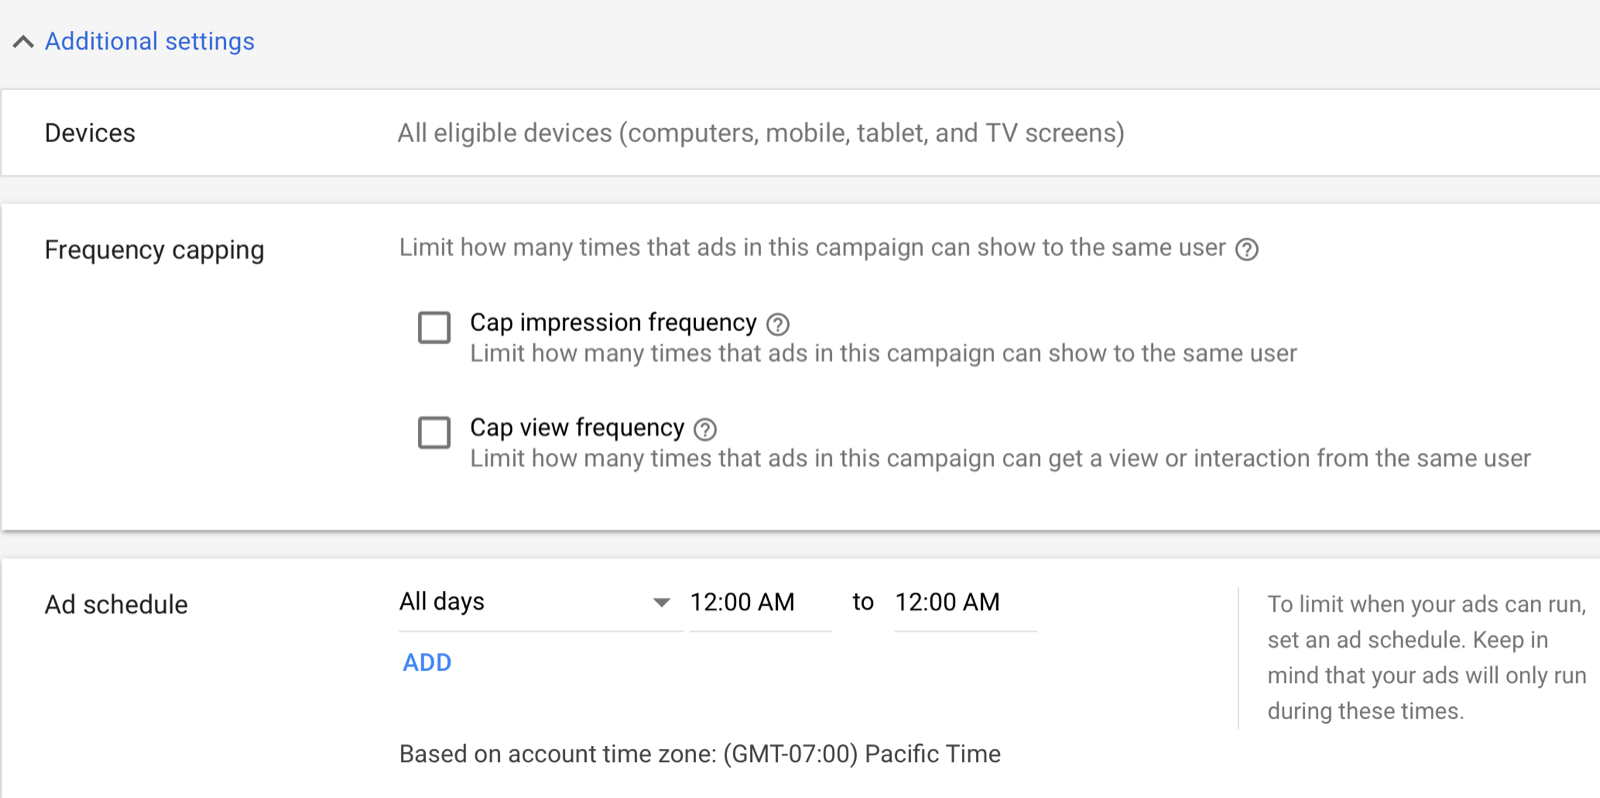
You can also set an ad schedule but most advertisers don’t bother doing anything here.
I take a different approach, however, because I want to know which days and at roughly what time my campaigns are performing well (or not). To do this, I set 4-hour windows for each day that I’m running ads. This allows me to adjust my bid based on day/time.
If Monday 4:00 PM–8:00 PM is performing well, I’ll bid aggressively so I don’t miss out in the auction. If Thursday 8:00 PM–12:00 AM is underperforming or wasting my budget, I’ll bid negatively to save my advertising dollars.
#3: Set Up Ad Groups and Audience Targeting
The next step is to set up your ad groups. Rather than name your ad groups “ad group 1,” “ad group 2,” and so on, use descriptive names. For instance, if you’re setting up an ad group for targeting by keywords, you might name the ad group “Keywords.”
Define Your Audiences and Demographics
You have a lot of options for targeting your audience on YouTube. You can make your targeting as narrow or broad as you want. The choice is yours.
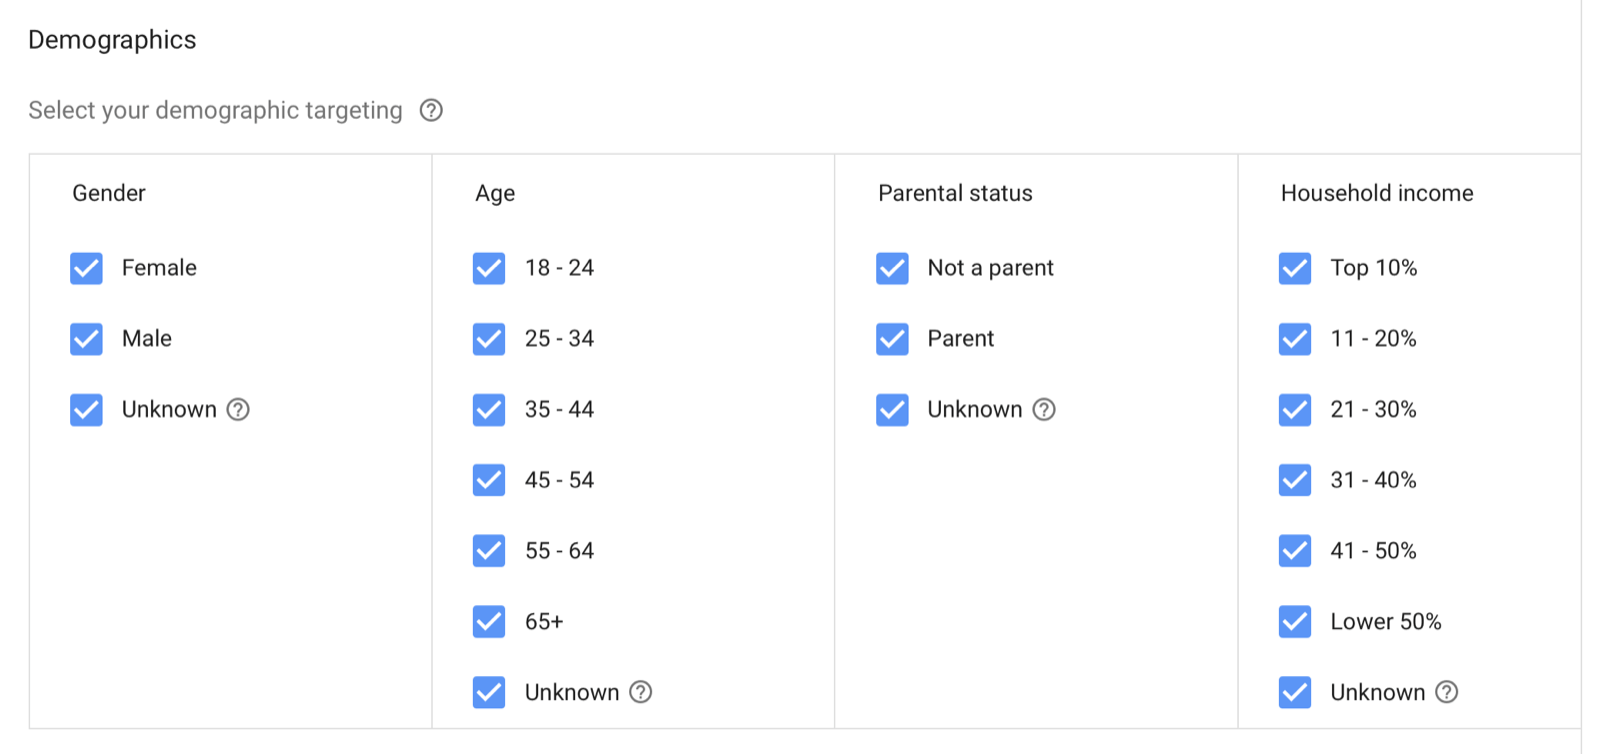
Start by selecting the gender, age, parental status, and household income of your target audience.
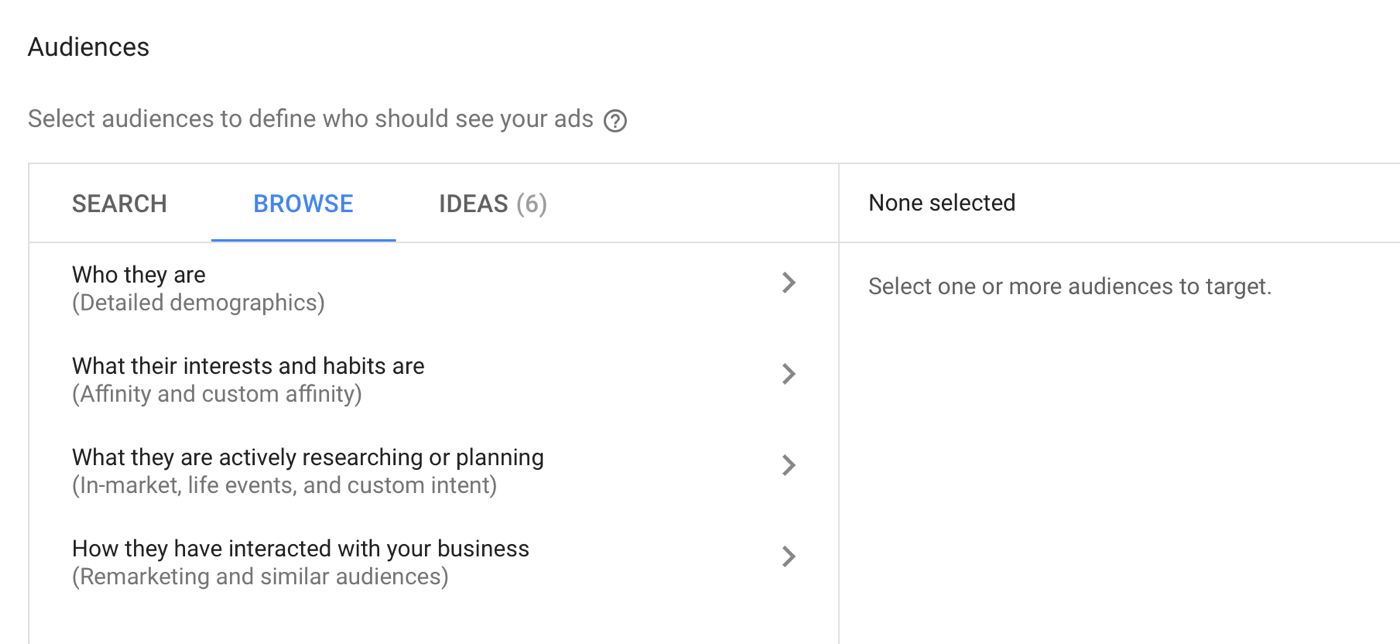
Click Audiences to see these additional options for fine-tuning your targeting:
- Affinity and custom affinity: An affinity is a long-term interest someone has about a subject or category. You can create your own affinity audience using interests, URLs, and places.
- In-market: These are people in the market for a particular product or service. They’ve searched and surfed for a keyword or keyphrase in the past 14 days.
- Life events: These are audiences that have moved recently, purchased a home, retired, gotten married, and so on.
- Custom intent audience: Add at least 50 tightly knit keywords to set up a custom intent audience. Google will then try to show your ads to people who are searching for these keywords.
- Remarketing: This is the most powerful audience you’ll have. These are people who have visited your website or landing page, or viewed any of your YouTube videos.
Narrow Your Reach With Keywords, Topics, and Placements
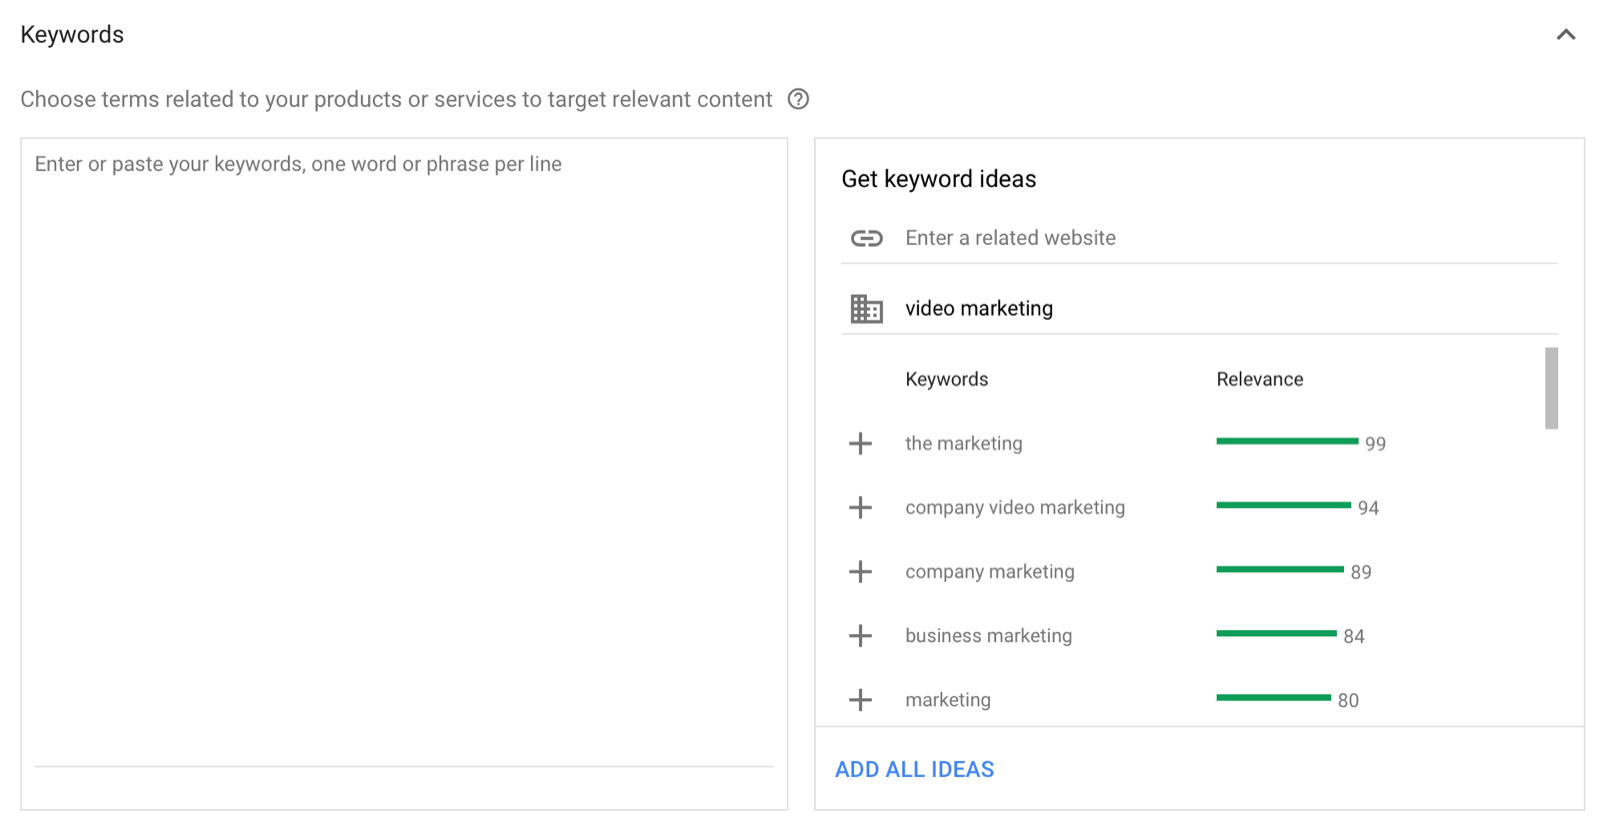
YouTube lets you show your ads based on keywords related to a YouTube video, channel, or website that your target audience has shown an interest in. In the Keywords sections, enter a keyword (such as “video marketing”) on the right and you’ll see a list of potential keywords you can target. Simply click on a suggested keyword to add it to the list on the left.
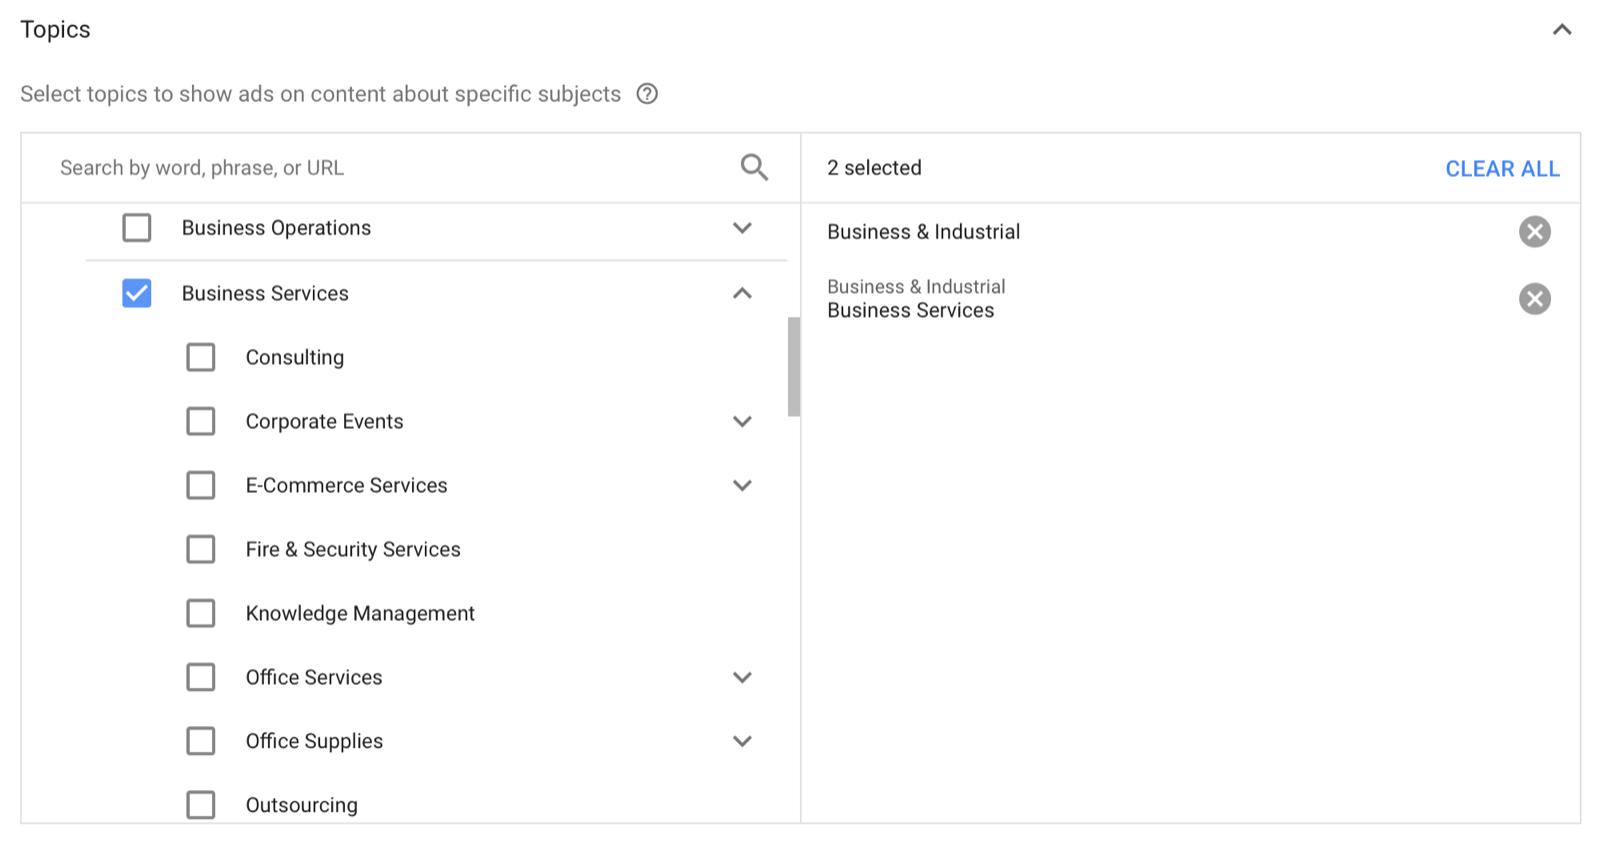
Under Topics, you can choose specific topics for targeting your YouTube video ads. To illustrate, if you choose to target Business Services, your video ads will be shown on videos for consulting, corporate events, eCommerce, and similar topics.
Under Placements, you can target specific videos, channels, or websites on the Google Display Network or YouTube.
Pro Tip: Test each of your audiences in their own ad group so you can see which ones work best. Remember that every campaign is different and what may work for you may not work for others.
#4: Set a Bid Amount
The next step is to set a maximum CPV bid, which is the amount you’re willing to pay for a view. A view is when someone watches your video for a minimum of 30 seconds (or until the end if it’s shorter) or clicks on your ad. So if someone clicks the Skip Ad button after 8 seconds, you get free branding and advertising.
I recommend starting with a bid of around $0.10, and once you start getting impressions, tweak the bid based on your results.

If you want to show your video ad on high-traffic videos (top content), adjust your bid.
#5: Create Your YouTube Video Ad
Along with horizontal videos (16:9), you can now upload square (1:1) and vertical (9:16) videos to YouTube. Square and vertical videos add variety to your creative assets and fit the natural intent of the user to watch the video in a vertical mode when holding their smartphone. Keep in mind that more than 75% of YouTube watch time happens on smartphones and tablets.
Creating a variety of different video creatives for your campaigns will help you better engage viewers.
To use a video for your ad, you need to upload it to YouTube first (if you haven’t already done so). Then copy the video URL and paste it into the Create Your Video Ad section in your ad setup.
Pro Tip: You should have at least two or three video ads in an ad group so you can split test. Create different versions of the same ad.
For the video ad format, select In-Stream Ad video. Note that in-stream ads are skippable after 5 seconds.
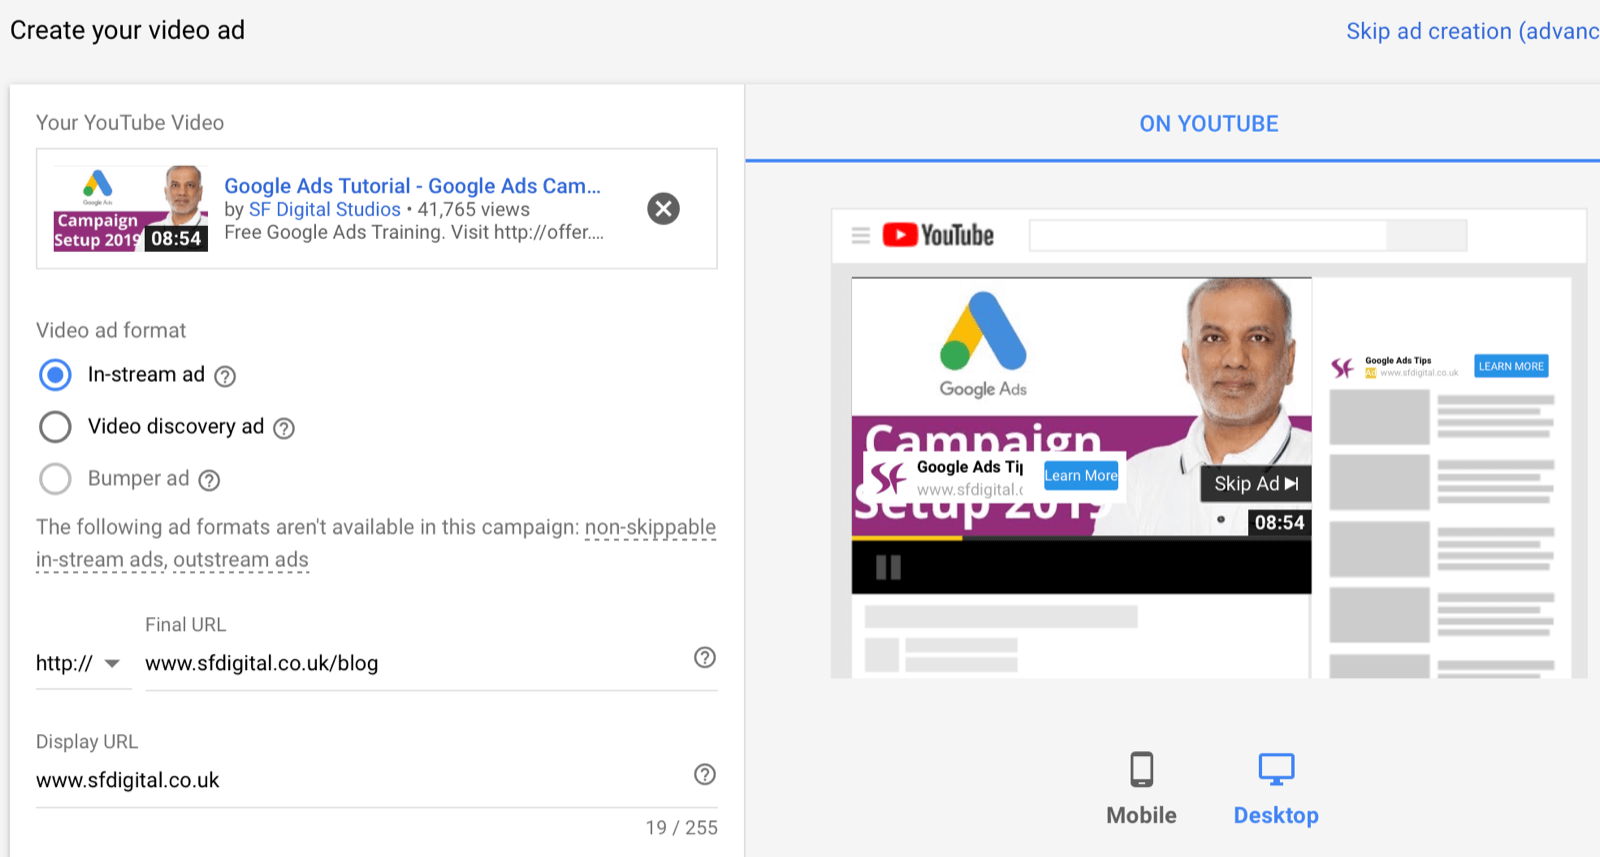
Next, enter the final URL (where people go after clicking on your ad) and display URL (the URL that appears in your ad). Both URLs need to be on the same domain or your ad won’t be approved.
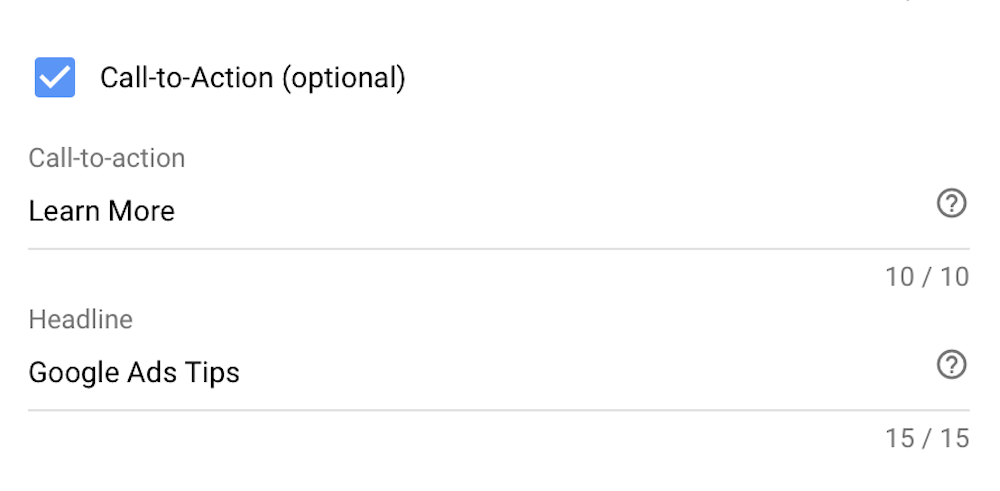
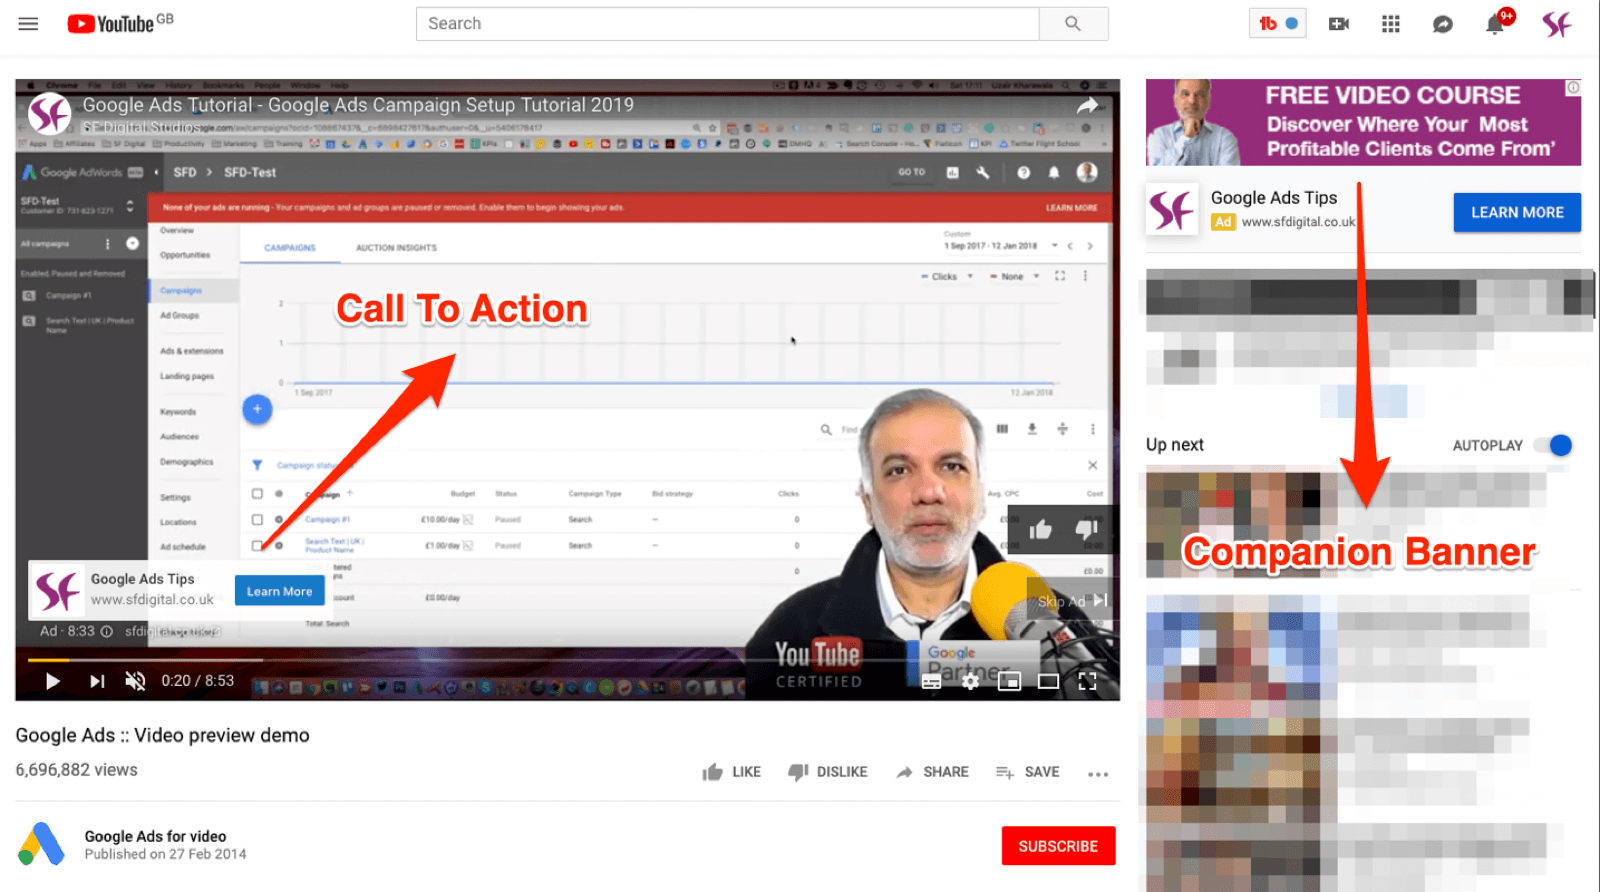
Including a call to action is important because you want the viewer to click the call-to-action button and visit your website. Enter a call to action and headline as appropriate.
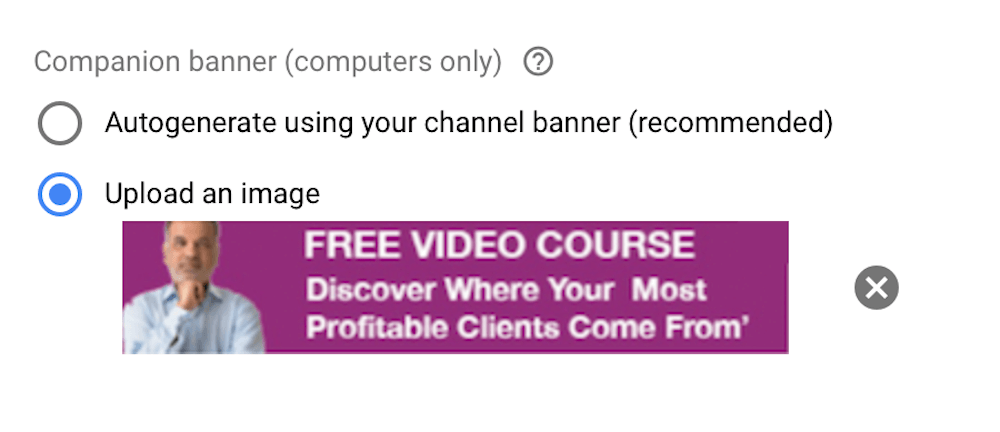
The companion banner gives you more YouTube real estate on desktop. The banner shows at the top of the screen to the right of the video. The banner size is 300 x 60 px. Note that the banner will continue showing on the screen even if the ad has been skipped.
Here’s what a video ad looks like on the view page with the call-to-action button and companion banner.
When you’re done setting up the ad, click Save and Continue to complete the setup of your video ad campaign.
Pro Tip: You can remarket to anyone who’s viewed one of your YouTube videos with a video ad or a banner ad on the Google Display Network or YouTube. To build your remarketing audience, traditionally you need to get the visitor to your website which requires that they click on the ad. Building a remarketing list with those who viewed your YouTube video costs a fraction compared to search, display, or any other kind of ads.
You don’t need to bring a visitor to your website to put them in your remarketing list. As long as the viewer has viewed your video either on YouTube or a video that’s embedded on any website, you can build your remarketing list or audience at an extremely low cost.
Conclusion
YouTube video ads are one of the most effective, powerful ways you can get leads, generate sales, and raise brand awareness. The metrics you should keep an eye on will depend on your campaign goals.
If you’re looking to build brand awareness, sell products, boost signups, or build your email list, monitor the video view rate. The view rate is a good indicator of how compelling viewers find your video ad. The higher the rate, the more engaged viewers are with your content. I typically look for a view rate of 20% at a minimum. If the view rate is below 20%, consider changing the ads or the targeting.
If your goal is to drive traffic to your website or landing page, click-through rate (CTR) is the right metric to look at and optimize for.
By :Uzair Kharawala